Beginner's Guide to Homemade Maple Syrup


What You Need to Know About Real Maple Syrup
First, let's talk about what maple syrup is not. Maple syrup is not the "pancake syrup" that most of us typically buy at the grocery. That stuff is completely artificial--corn syrup, flavorings and dyes. Yuck! I can't believe I used to feed my family that!
Real maple syrup starts out as sap from that big, beautiful tree you may have in front yard: the maple tree. Sugar maple tree to be exact--but several varieties of maple tree will give sap, so don't worry if you aren't sure!
Every year in late winter/very early spring, that big maple tree in your yard starts producing sap, a clear, slightly sweet liquid that provides the nutrients the tree needs to produce leaves. That sap is collected and boiled down into deliciously sweet maple syrup.
Did you know, the sap's flavor, color and nutrient make-up actually changes as the season progresses, with lighter, more delicate syrup being made from sap produced early in the season and darker, heartier syrup being made from sap produced as trees get closer to setting their buds.
The sap's flavor, color and nutrient make-up actually changes as the season progresses
Why is Real Maple Syrup so Expensive?
Pure maple syrup costs about $7-$12.00 a pint or $40-$96 a gallon, depending on the weather during the tapping season which, I know, seems awfully expensive for something grown or produced from wild, native trees that many of actually keep in our yards.
However, sap can only be collected from mature trees that are at least 20 years old, and it flows only one month out of the year (if you're lucky), typically between about mid-February to mid-March, when the maple trees are gearing up to set their buds, and only in certain areas of the US, where temperatures are just right.
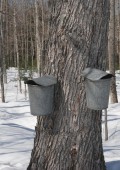
As if that isn't enough, Sap is collected from the trees in buckets and boiled down to just 1/40h of its original volume, creating 100% pure maple syrup.
Why Not Make Maple Syrup Yourself?
Fortunately, If you live in the Canada or Northeastern parts of the US, "Maple Syrup-ing" is a pretty easy process and you can make your own homemade maple syrup (practically for free), right in your own back yard... or front yard... or side yard.... you get the drift.
You just need to have a mature maple tree in your yard and live in an area where the daytime temperature rises above freezing and the nighttime temperature falls below freezing in late winter.
Best Maple Trees for Syrup Making


What Types of Maple Trees Can be Tapped to Make Maple Syrup?
Sugar Maples have the highest sugar content and therefore make the best syrup, but you can also tap Black, Red, or Silver Maples. Only tap mature trees, those that are at least 12 inches in diameter, receive a good amount of sunlight, and are healthy. If you aren't sure what kind of Maple Tree you have, give it a try to see how it comes out. The supplies needed for home production are inexpensive enough that you really wont be out much for trying.
But what if you do not have Maple trees? Well, you may still be in luck. While I am focusing on maple trees, other types of trees, like Birch and Walnut can be tapped and will yield a sweet sap as well. Alaska, for example, where maple trees do not grow, has a thriving Birch sap industry.
How Much Maple Syrup Can I get From One Tree?
The Amount of Syrup you will get from each tree depends on several factors including the type and health of tree you are tapping, the amount of sunlight it receives and weather conditions during the tapping season.
Generally speaking you should get between 10-20 gallons of sap per tap during the tapping season. According to Cornell University R&E program, it takes about 3 taps to produce enough sap to make about one gallon of syrup.
Obviously, a home producer probably will not be producing enough syrup to sell, but you will probably get enough for your family to eat real Maple Syrup all year long.
How Many Taps Can I Put in Each Tree?
The larger the diameter of the tree, the more taps you can use. Advice on this varies depending on who you ask, but it is generally recommended that you use no more than 3 taps per tree. See the two tables below for the guidelines as found from the Cornell University Extension Project, http://maple.dnr.cornell.edu/FAQ.htm
Tap Guidelines From Cornell University Extension Project
Tree Diameter
| Maximum Number of Taps
|
|---|---|
10-17" Diameter
| 1
|
18-24" Diameter
| 2
|
25" or Greater
| 3
|
Tap Guidelines From www.TapMyTrees.com
Size of Tree
| Maximum Number of Taps
|
|---|---|
12-20 Diameter
| 1
|
21-27 Diameter
| 2
|
Greater than 27" Diameter
| 3
|
Maple Syruping Supplies
You will need a few things to get started tapping your trees:
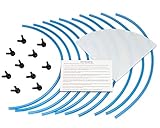
- Spiles (also known as "taps"): Spiles typically come in stainless or heavy plastic.
- Buckets to collect the sap and a hook to hang the bucket from the tap. Alternatively, you can use set a lidded bucket next to the tree and run flexible piping from the tap to the bucket.
- A drill with a 7/16 drill bit with 3/8 shank: used to drill the tap holes into your maple tree
- A hammer: to lightly hammer the taps into place.
- Pliers: to remove the taps at the end of the season.
Purchase Tapping Supplies
Essential Equipment and Tools
To process the sap into syrup you will need:
- Food grade plastic or glass storage containers for storing the sap until you are ready to process. Well-washed and rinsed glass milk jugs or 2-liter bottles work well for this.
- A large vat: to cook the sap. The home syrup maker could probably get away with a large canning vat, especially if she doesn't mind processing every few days.
- A method to evaporate the sap. We use a turkey fryer like this one to evaporate most of the water off and finish the sap inside on the stove. We surrounded the burner with landscape bricks to help keep the heat in and use less propane.
- Cheese cloth: to strain the sap before adding to the vat. Do not be alarmed, but bugs and bits of debris will probably make their way into collection bucket. Remember, you are straining them out and will then boil the liquid. It's not a big deal.
- A smaller pot: --a regular kitchen saucepan will work fine--for finishing off the syrup
- Candy thermometer
- Sealable containers for storing the finished syrup. Ball jars work great for this and pour spouts can be purchased from amazon. You could also purchase syrup jars online.
Maple Syrup Jars


The Process: Tapping the Trees
- Start by cleaning the spiles, bucket, tubing and lids in a 1:20 solution of bleach water. Use a brush or cloth to scrub your supplies and then rinse everything with hot water twice.
- Collect all of your tapping equipment and head out to your first tree. You will want to drill your tap holes about three feet high and not within 6" of any former tap holes. Above a large root or below a large branch is ideal. If using more than one tap, distribute them evenly around the tree and avoid any damaged areas.
- Drill the tap holes using either a 7/16 or 5/16 drill bit (depending on the type of tap) at a slight upward angle about 2-2.5" deep. Watch for light brown shavings, indicating you are in healthy sapwood. If shavings are dark brown, try again in another location.
- Gently tap the spile into the hole. You will immediately see sap dripping if it is flowing.
- Hang the Bucket set the bucket into place. Insert one end of tubing into a hole cut in the bucket lid, and push the other end over the tap.
Want To See the Process In Action?
See the Process in Action
The Process: Collecting the Sap
- While the sap is flowing, you will need to collect it everyday; strain it through a piece of cheese cloth and pour it into your storage containers. Some days you will collect very little sap; other days the sap will be almost overflowing. Totally normal.
- You must keep the sap cold--between 33 and 38 degrees until processing, and process the sap within 7 days. You will need to throw out any sap that has frozen, but the unfrozen portion is fine to use.
Watch the Process: Turning That Sap into Syrup
The Process: Turning That Sap into Maple Syrup Gold
- Set up your outside heat source or turn on your kitchen fan and open the windows. Rub a little oil around the rim of the vat to keep the sap from bubbling over.
- Pour sap into the large vat until it is 3/4 of the way full with sap. Start boiling the sap down, refilling the vat as it boils down until you have added all of the sap. Add the sap slowly as to maintain the boil.
- Continue boiling the sap until it has turned a golden color and has boiled down significantly, to the point where it can be transferred the smaller saucepan. It takes about 9 hours to boil down 7 gallons of sap.
- At this point, you can move indoors, if you aren't there already. Transfer the sap into a saucepan and continue to boil the sap until it takes on a consistency of syrup and has reached a temperature of 219 degrees or 7 degrees above the boiling point for your altitude.
- When it's finished, you will want to filter out the sediment in the syrup. You could purchase a food grade filter, but the maker syrup maker could just as easily use fine cheesecloth. You could also let the syrup stand overnight in the refrigerator, letting the sediment sink to the bottom. Then, simply pour off the syrup, leaving the sediment in the pan.
- Reheat the syrup to 190 degrees and pour the syrup into sterilized ball or syrup jars. Screw on sterilized lids and leave on the counter to seal.
- Sealed jars will keep over one year. Once open, you'll want to use it within 2 month. I doubt that will be a problem.
© 2014 Sarah